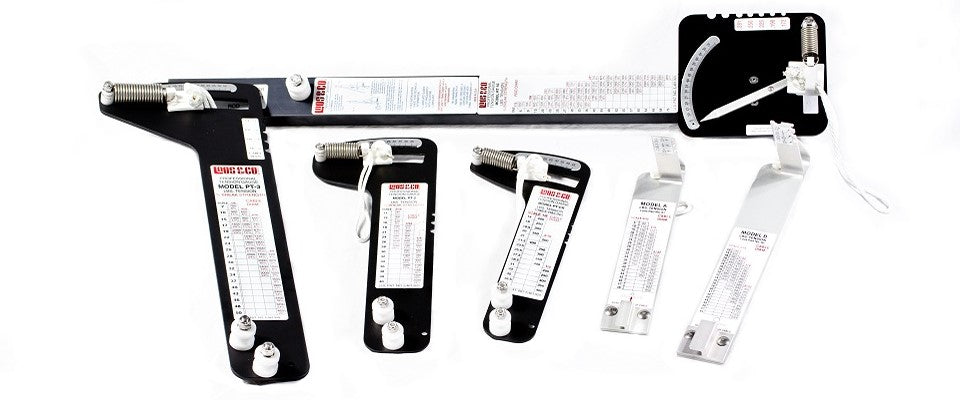
For most racers, repeatable tuning of the sailboat's standing rigging is a must when trying to reach the right tune that makes you the fastest crew in the fleet.
Loos rig gauges allow quick and accurate measurement of shrouds and stays to achieve the perfect rig tune. With the following guide, you will be able to read both the Standard gauges (Model A and B) for 2.5 mm to 7 mm wire and PRO Rig Tension gauges (Model PT-1, Model PT-1M, Model PT-2, Model PT-2M, Model PT-3 and Model PT-3M) for 2.5 mm to 10 mm, and be one step closer to having the fastest boat of the regatta.

Which diameters are available for each Tension Gauge type?
The following table shows the Loos gauges available models and the compatibility with different wire diameters.
| Tension Gauge | Cable Size |
|---|---|
| Model A | 3/32", 1/8", 5/32" |
| Model A Metric | 2.5mm , 3mm, 4mm |
| Model B | 3/16", 7/32", 1/4" |
| Model B Metric | 5mm, 6mm, 7mm |
| Model PT-1 | 3/32", 1/8", 5/32" |
| Model PT-1M | 2.5mm, 3mm, 4mm |
| Model PT-2 | 3/16", 7/32", 1/4" |
| Model PT-2M | 5mm, 6mm, 7mm |
| Model PT-3 | 1/4", 9/32", 5/16", 3/8" |
| Model PT-3M | 7mm, 8mm, 9mm, 10mm |
How to measure with Standard series?
Firstly, hook the gauge on the cable, then pull the lanyard until the pointer is positioned at the black calibration mark (green arrow). Next, read the scale at the exact point where the middle of the cable touches the scale (black arrow). For best accuracy, the gauge should be held so that the scale barely touches the cable, thus eliminating friction. Please consider that excessive pull on the lanyard (pulling the pointer beyond the calibration mark) may permanently bend the spring and damage the gauge.

How to measure with the PRO series?
Hold the gauge with one hand and place the cable between the two nylon spools. With the other hand, pull the lanyard and extend the spring until the hook on the nylon slider can be hooked on the cable. Release the lanyard and read the needle position on the scale. Refer to the calibration table to obtain the correct tension in the cable. The gauge can be left on the wire for "hands-free" cable adjusting.
To confirm you're getting accurate readings, ensure that the slider moves freely in the frame slot and does not bind. Also, lubricate the slider slot frequently with silicone lubricant.
Tip: wiggle the gauge around a little and let the slider settle to the middle position.
How to read equivalence charts?
It is essential to know that these gauges are intended to be used on 302 / 304 1X19 SS cables in appropriate sizes. If used on other cable types, sizes and construction, your readings would be consistent but pound tension values would differ from those listed on the label.
To understand how to read the equivalence tables, let's take a Hobie 33 and measure the upper shrouds. The wires are 3/16", and we used the Loos tension gauges to measure it in this example. We got 21 on our first reading, and we want to achieve at least 26% of the breaking strength of the wire.
To get the tension needed for this example, we should firstly verify at what % the shroud currently is. We then go to the equivalence table, where we first look at the Scale numbers on the left part. We got a 21 for the previous reading, so we go to the right until we cross the column of the 3/16" wire (second column).
We find that there are 3 numbers in the cell, one in black (lbs) on another one in red (% from breaking strength). So to know how many pounds of tension we got, we look at the black number, which marks 640 lbs. To know what percentage we are from the breaking strength point, we look at the red number, which indicates it is 14%.
Now we know our shroud is too loose. So then, we adjust the turnbuckles until we reach the 26% break strength needed, which equals a 28 on the scale from the tension gauge.
You can apply this logic to any of the tension gauges from Loos. Please take into consideration that the tension needed for each wire will vary. There is no simple solution since the optimum rigging tension will be a function of the boat design, the rig (masthead or fractional, one or more spreaders, etc.), and even the cut of the sails.
For the convenience of sailors who wish to upgrade from our Model A or B gauges to the professional model (PT-1, PT-2, or PT-3) gauges, L-36 develop a conversion chart so that the same recommended tension can be obtained with the PT -1, PT -2 or PT -3 gauges as with the Model A or B gauges.
| Model A | PT-1 | PT-1 | PT-1 | Model B | PT-2 | PT-2 | PT-2 | PT-3 |
|---|---|---|---|---|---|---|---|---|
| Scale | 3/32" | 1/8" | 5/32" | Scale | 3/16" | 7/32" | 1/4" | 9/32" |
| 5 | 6 | 10 | 11 | |||||
| 10 | 9 | 15 | 13 | |||||
| 15 | 12 | 14 | 18 | 15 | ||||
| 20 | 16 | 16 | 20 | 16 | 18 | |||
| 25 | 20 | 19 | 22 | 18 | 20 | |||
| 28 | 23 | 21 | 24 | 19 | 22 | |||
| 30 | 22 | 26 | 21 | 24 | ||||
| 35 | 27 | 25 | 28 | 23 | 25 | |||
| 38 | 30 | 28 | 30 | 25 | 27 | 25 | ||
| 40 | 33 | 30 | 32 | 27 | 29 | 27 | ||
| 42 | 33 | 34 | 29 | 31 | 29 | |||
| 44 | 36 | 36 | 33 | 31 | ||||
| 45 | 38 | 38 | 36 | 33 | 6 | |||
| 46 | 39 | 39 | 37 | 34 | 7 | |||
| 47 | 40 | 40 | 36 | 9 | ||||
| 41 | 37 | 10 | ||||||
| 49 | 39 | 11 | ||||||
| 43 | 40 | 12 | ||||||
| 44 | 14 | |||||||
| 45 | 16 | |||||||
| 46 | 18 | |||||||
| 47 | 20 | |||||||
| 49 | 25 |
If you have any questions regarding standing rigging and fine-tuning for your boat, don't hesitate to Contact Us. Our sailing experts will be happy to help you.


